Sunday, August 11, 2013

BURLAP WHEATGRASS FAVORS

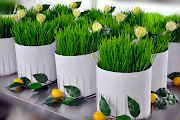
Here's a little something I've been thinking about photographing for a long time now. I've received so many favorable emails and comments on the wheatgrass-daisy centerpiece I posted here several years ago, I thought it would be nice to make my return to blog-writing another floral piece.


These little favors are so easy and inexpensive to make, you won't believe it.  They make lovely giveaways at showers, weddings, fundraisers, health-related events, home and garden shows, and frankly anywhere.

The idea actually started out as a concept for a cancer fundraiser, where the appropriate colored ribbon could be used in addition to an inspirational message or promotional item, but the favor works well without any add-ons, especially in a situation where a colored ribbon alone can say so much. You can also add tiny fresh flowers for visual beauty and aroma.  I personally love to work with lavender for its aroma, beauty, AND health benefits, but you may also want to consider hydrangea, wax flowers, and mums.


The wheatgrass itself is grown in classic seed starting trays using coco coir.  After 5 or 6 days, each of the plugs are wrapped in a small sheet of 4"X4" cello to retain moisture and to keep the plug from leaking or staining table linens.  Then they are covered with 6"x6" burlap and tied with any variety of string or ribbon.

Voila! 

Refrigerate your completed favors until ready to set out.  This will reduce the rate of growth.  Remember that unrefrigerated wheatgrass at this stage continues to grow about an inch a day, which may change the desired look of your final piece.

Everything you need from Amazon!  Click on images for pricing.

Tuesday, July 20, 2010

DAISY CENTERPIECE

A little something for the summer table.  Done up in a 6" glass square, this wheatgrass centerpiece was cut-to-fit and garnished with daisies and baby's breath.  Add a taper as a perfect centerpiece for the dinner table, or insert table tags as centerpieces for large events.  This one will be on display at our "Free Shots" table for tonight's 6:30pm showing of the movie FRESH at the Waverly Community House in Waverly, PA.


GROWER'S PICKS:
Everything you need from Amazon! Click on images for pricing.

Wednesday, July 7, 2010

SUMMERTIME WATERING TIPS

The fact that my sales seem to rise in the summertime reminds me of an issue we all wish didn't exist:  mold.  Many home-growers just give up the ship and order from professional growers when the summertime hits because they just can't take the heat from moldy crops due to high humidity.  Truth be told, even in my climate-controlled growing room, the threat of mold is an issue I still need to deal with due to constant outdoor heat and humidity beating at my door.  It taxes the air and dehumidification systems, raises my electric bill and general operating costs, and reminds me that if there's one thing I can do to help make the situation better, that would be to WATER LESS.

Analog HygrometerOptimal humidity level for growing wheatgrass is between 40 and 60 percent.  I tend to shoot for 50 percent.  In the wintertime, I actually need to introduce humidification to the room because I cannot even reach 35 percent.  In the summertime, without dehumidification, my growing room could easily reach 90 percent.  At a 50-55 percent humidity level, I have found that a LIGHT watering once daily is just enough to keep the grass turgid but not produce root rot and its concurrent mold.  You'll know you're overwatering if you lift that mat of grass and find brown circles as opposed to a nice clean white root system.

At humidity levels over 60 percent, you may only need to water your grass once every two days.  Sometimes if I know I will be away for a couple days in the summer and will have to miss a day of watering, I use this knowledge to my benefit and turn down the dehumidification system to run at about 65 percent room humidity with increased fan circulation, but I'll never press it beyond that.  Generally speaking, room humidity at 70 percent and above for more than 12 hours once the grass has already grown an inch or two high can ultimately result in crop failure, so I try at all costs to make sure that never happens.

If root rot and the mold it attracts seem to be bringing down your summer grass-growing ambitions, why not make a small investment in a hygrometer to help you manage your watering needs?  If you grow your grass on tiered racks, invest in several hygrometers--one for each shelf.  Remember that each shelf has its own microclimate.

If climate problems are not only bringing you down but driving you nuts, you may want to take that next step in your growing career and make a larger investment in a portable all-in-one system for your growing area.  Before I made the ultimate investment in a dedicated growing room, this type of unit served me well in all seasons and still serves as a backup for me if anything on my larger units fail.

Good luck and happy growing! Remember, when it comes to summertime watering, sometimes less is more!

Tuesday, July 6, 2010

THE GREEN BANANA

Here's a little recipe to put that electric juicer of yours to good use.  I used my beloved Omega 8005 all-purpose juicer.

Perfect on a sweltering hot summer day (like today), this green ice cream recipe is about as natural as ice cream gets.  It doesn't melt nearly as fast as regular ice cream, and it's so much healthier for you!
THE GREEN BANANA
1/2 ounce fresh wheatgrass juice
4 ounces frozen overripe bananas

Juice wheatgrass and set aside. Remove pulp residue from auger and juicing cups. Swap out strainer piece on juicer for its solid attachment. Press frozen bananas through the juicer into the juicing cup. Gently fold wheatgrass juice into the frozen, pressed bananas with a fork.  Place serving dish at the end of the attachment and send the banana-wheatgrass mixture through the juicer again for a smooth, consistent blend. Add a few sprigs of wheatgrass for garnish.
It's a lot easier than it sounds and really only takes a few minutes.  The final taste is truly that of a refreshingly cold unripened banana.

Monday, April 19, 2010

WHEATGRASS-LAVENDER CENTERPIECE

I had the pleasure of providing centerpieces for a USANA Spa Party yesterday afternoon.  Easy to grow and decorate, these simple centerpieces provide classic spa ambience to any room.  Fill a 10" round glass dish (purchased at Michael's) to 1" from the top with a 3 parts soil/1 part peat moss mix.  Sprinkle soil evenly with 2/3 cup Hard Spring Wheat Berries purchased from Wheatgrasskits.com (first soaked in water for 8 hours).  Lightly water seeds after sprinkling on the soil. Cover loosely with plastic wrap.  Water lightly once daily each morning.  Remove plastic wrap when grass reaches the height of the plastic and continue to water lightly once daily each morning.  Keep under an even light source, NOT in direct sunlight.  Remember that grass will tend to lean toward its light source, so your best bet for centerpieces is to keep them under a flourescent shop light, preferably full spectrum. Grass reaches optimal centerpiece height at around 4-5".  A general rule of thumb to know when to start soaking your seeds for your event is to allow one extra day for every inch.  For example, if you want your grass to be about 5" high for your event, plan to start soaking your seeds 6 days before the event.  If you want your grass to be about 6" high, start your seeds 7 days before the event.  Remember that wheatgrass will not start taking on that lush, thick look until around day 5, so you really don't have the option to plan for anything shorter than a 4" grass.  It will start to yellow and grow weak past day 10, so it shouldn't be planted too early either.  This particular centerpiece was finished off with dried lavender sprigs from last summer's garden.


AgMap

Mountain Rose Herbs. A Herbs, Health & Harmony Com